個人で ansible の動作確認をしたい方のために、Windows 11 の VMWare WorkStation Pro で Ansible 検証環境を構築する方法を紹介します。
前提
Ansible の検証環境を用意したい!と思ったものの、クラウドだとお金かかるし、
Docker でもいろいろ制限があって無理で、、、で苦労しました。
WSLだとローカル環境に対してしか検証できないし…とか。
(実際やり方はあるかもしれないけど、、)
そこで、個人利用に限って無償で使える VMWare WorkStation Pro を使用することにしました。
VMWare WorkStation Pro のインストール方法は多くの方が記事を上げてくださっていたので参考にさせていただきました。
VMWare WorkStation Pro 環境構築
VMWare 側の用意は WorkStation Pro をインストールした後に OS の iso ファイルをダウンロードするだけです。
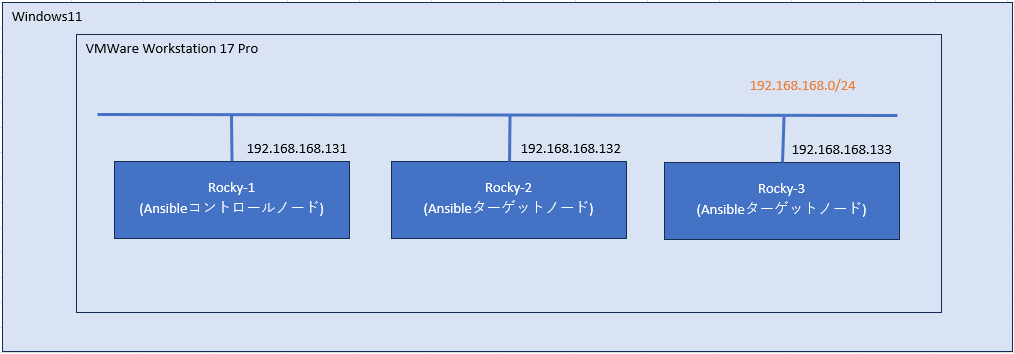
今回はホスト名 Rocky-[123] として VM を3台作成しています。
OS は Rocky9.4 の DVD ISO を公式からダウンロードして入れました。
https://rockylinux.org/ja/download
OS側の初期インストールについても一般的な手順と変わりないので、VMのスペックだけ記載してあとは省略します。
| メモリ | 2GB |
| CPU数 | 2 |
| ディスク | 20GB |
| パッケージ | 最小限のインストール |
作成した VM は SSH 用の追加設定等は不要で、インスタンス作成時に割り当てられる IP にホスト OS から SSH 接続できるようです。
ただし、root のリモートログインはデフォルトで禁止されているので、必要に応じて /etc/ssh/sshd_config にて PermitRootLogin を yes に変更してください。
環境の構成図は以下のイメージです。
Ansible 環境構築
Ansible 実行ユーザ作成(コントロールノード)
まず,コントロールノードに Ansible 実行ユーザ(ansible)を作成します。
sudo 可能にするため、wheel グループをつけて、パスワードも設定します。
# useradd -G wheel ansible
# passwd ansible
後ほどターゲットノード側にも同じく ansible ユーザを作成するため、鍵認証用の公開鍵と秘密鍵を作っておきます。
[ansible@Rocky-1 ~]$ ls -la
合計 16
drwx------. 2 ansible ansible  83  9月 28 15:52 .
drwxr-xr-x. 4 root    root     33  9月 28 15:49 ..
-rw-------. 1 ansible ansible  22  9月 28 15:52 .bash_history
-rw-r--r--. 1 ansible ansible  18  4月 30 20:28 .bash_logout
-rw-r--r--. 1 ansible ansible 141  4月 30 20:28 .bash_profile
-rw-r--r--. 1 ansible ansible 492  4月 30 20:28 .bashrc
[ansible@Rocky-1 ~]$
[ansible@Rocky-1 ~]$ mkdir .ssh
[ansible@Rocky-1 ~]$ chmod 700 .ssh/
[ansible@Rocky-1 ~]$
[ansible@Rocky-1 ~]$ cd .ssh/
[ansible@Rocky-1 .ssh]$
[ansible@Rocky-1 .ssh]$ pwd
/home/ansible/.ssh
[ansible@Rocky-1 .ssh]$
[ansible@Rocky-1 .ssh]$ ssh-keygen -t rsa -b 4096
Generating public/private rsa key pair.
Enter file in which to save the key (/home/ansible/.ssh/id_rsa):
Enter passphrase (empty for no passphrase):
Enter same passphrase again:
Your identification has been saved in /home/ansible/.ssh/id_rsa
Your public key has been saved in /home/ansible/.ssh/id_rsa.pub
The key fingerprint is:
SHA256:mmjVmMjSwm4NxzuMaN01HmGhL6WKg00QN5mVhX29GvE ansible@Rocky-1
The key's randomart image is:
+---[RSA 4096]----+
|. o+.=.. .       |
| oo.o o + .      |
|.    . = o .     |
| o + .=+o E      |
|  * *o+=So       |
|.=oOo++o+        |
|o+=oB.o.         |
|.... .           |
|                 |
+----[SHA256]-----+
[ansible@Rocky-1 .ssh]$
[ansible@Rocky-1 .ssh]$ cp id_rsa.pub authorized_keys
[ansible@Rocky-1 .ssh]$ chmod 600 authorized_keys
[ansible@Rocky-1 .ssh]$ ls -la
合計 12
drwx------. 2 ansible ansible   61  9月 28 15:58 .
drwx------. 3 ansible ansible   95  9月 28 15:54 ..
-rw-------. 1 ansible ansible  741  9月 28 15:58 authorized_keys
-rw-------. 1 ansible ansible 3434  9月 28 15:56 id_rsa
-rw-r--r--. 1 ansible ansible  741  9月 28 15:56 id_rsa.pub
[ansible@Rocky-1 .ssh]$
Ansible インストール
パッケージ版でも良いですが、今回は Rocky-1 のホストをコントロールノードとして、python の venv 環境でのインストールにします。
python3 系が必要ですが、Rocky 9.4 はデフォルトで 3.9.18 が入っていたので問題なしです。
[ansible@Rocky-1 ~]$ python -V
Python 3.9.18
[ansible@Rocky-1 ~]$
[ansible@Rocky-1 ~]$ python -m venv myvenv
[ansible@Rocky-1 ~]$ source myvenv/bin/activate
(myvenv) [ansible@Rocky-1 ~]$
最新版を入れるので、pip をアップグレードしてから ansible をインストールします。
(myvenv) [ansible@Rocky-1 ~]$ pip install --upgrade pip
Requirement already satisfied: pip in ./myvenv/lib/python3.9/site-packages (21.2.3)
Collecting pip
  Downloading pip-24.2-py3-none-any.whl (1.8 MB)
     |████████████████████████████████| 1.8 MB 5.3 MB/s
Installing collected packages: pip
  Attempting uninstall: pip
    Found existing installation: pip 21.2.3
    Uninstalling pip-21.2.3:
      Successfully uninstalled pip-21.2.3
Successfully installed pip-24.2
(myvenv) [ansible@Rocky-1 ~]$
(myvenv) [ansible@Rocky-1 ~]$ pip install ansible-core
Collecting ansible-core
  Downloading ansible_core-2.15.12-py3-none-any.whl.metadata (7.0 kB)
Collecting jinja2>=3.0.0 (from ansible-core)
  Downloading jinja2-3.1.4-py3-none-any.whl.metadata (2.6 kB)
Collecting PyYAML>=5.1 (from ansible-core)
  Downloading PyYAML-6.0.2-cp39-cp39-manylinux_2_17_x86_64.manylinux2014_x86_64.whl.metadata (2.1 kB)
Collecting cryptography (from ansible-core)
  Downloading cryptography-43.0.1-cp39-abi3-manylinux_2_28_x86_64.whl.metadata (5.4 kB)
Collecting packaging (from ansible-core)
  Downloading packaging-24.1-py3-none-any.whl.metadata (3.2 kB)
Collecting resolvelib<1.1.0,>=0.5.3 (from ansible-core)
  Downloading resolvelib-1.0.1-py2.py3-none-any.whl.metadata (4.0 kB)
Collecting importlib-resources<5.1,>=5.0 (from ansible-core)
  Downloading importlib_resources-5.0.7-py3-none-any.whl.metadata (2.8 kB)
Collecting MarkupSafe>=2.0 (from jinja2>=3.0.0->ansible-core)
  Downloading MarkupSafe-2.1.5-cp39-cp39-manylinux_2_17_x86_64.manylinux2014_x86_64.whl.metadata (3.0 kB)
Collecting cffi>=1.12 (from cryptography->ansible-core)
  Downloading cffi-1.17.1-cp39-cp39-manylinux_2_17_x86_64.manylinux2014_x86_64.whl.metadata (1.5 kB)
Collecting pycparser (from cffi>=1.12->cryptography->ansible-core)
  Downloading pycparser-2.22-py3-none-any.whl.metadata (943 bytes)
Downloading ansible_core-2.15.12-py3-none-any.whl (2.3 MB)
   ━━━━━━━━━━━━━━━━━━━━━━━━━━━━━━━━━━━━━━━━ 2.3/2.3 MB 9.6 MB/s eta 0:00:00
Downloading importlib_resources-5.0.7-py3-none-any.whl (24 kB)
Downloading jinja2-3.1.4-py3-none-any.whl (133 kB)
Downloading PyYAML-6.0.2-cp39-cp39-manylinux_2_17_x86_64.manylinux2014_x86_64.whl (737 kB)
   ━━━━━━━━━━━━━━━━━━━━━━━━━━━━━━━━━━━━━━━━ 737.4/737.4 kB 9.8 MB/s eta 0:00:00
Downloading resolvelib-1.0.1-py2.py3-none-any.whl (17 kB)
Downloading cryptography-43.0.1-cp39-abi3-manylinux_2_28_x86_64.whl (4.0 MB)
   ━━━━━━━━━━━━━━━━━━━━━━━━━━━━━━━━━━━━━━━━ 4.0/4.0 MB 9.6 MB/s eta 0:00:00
Downloading packaging-24.1-py3-none-any.whl (53 kB)
Downloading cffi-1.17.1-cp39-cp39-manylinux_2_17_x86_64.manylinux2014_x86_64.whl (445 kB)
Downloading MarkupSafe-2.1.5-cp39-cp39-manylinux_2_17_x86_64.manylinux2014_x86_64.whl (25 kB)
Downloading pycparser-2.22-py3-none-any.whl (117 kB)
Installing collected packages: resolvelib, PyYAML, pycparser, packaging, MarkupSafe, importlib-resources, jinja2, cffi, cryptography, ansible-core
Successfully installed MarkupSafe-2.1.5 PyYAML-6.0.2 ansible-core-2.15.12 cffi-1.17.1 cryptography-43.0.1 importlib-resources-5.0.7 jinja2-3.1.4 packaging-24.1 pycparser-2.22 resolvelib-1.0.1
(myvenv) [ansible@Rocky-1 ~]$
(myvenv) [ansible@Rocky-1 ~]$ ansible --version
ansible [core 2.15.12]
  config file = None
  configured module search path = ['/home/ansible/.ansible/plugins/modules', '/usr/share/ansible/plugins/modules']
  ansible python module location = /home/ansible/myvenv/lib64/python3.9/site-packages/ansible
  ansible collection location = /home/ansible/.ansible/collections:/usr/share/ansible/collections
  executable location = /home/ansible/myvenv/bin/ansible
  python version = 3.9.18 (main, Jan 24 2024, 00:00:00) [GCC 11.4.1 20231218 (Red Hat 11.4.1-3)] (/home/ansible/myvenv/bin/python)
  jinja version = 3.1.4
  libyaml = True
(myvenv) [ansible@Rocky-1 ~]$
sshpass も必要なのでここであわせてインストールしておきます。
# dnf install sshpass
インベントリファイル作成
RockyServers のグループに Rocky-[123] を所属させます。
[RockyServers]
Rocky-1 ansible_host=192.168.168.131
Rocky-2 ansible_host=192.168.168.132
Rocky-3 ansible_host=192.168.168.133
ansible.cfg 編集
ここがちょっと注意です。
今回、ansible 実行ユーザである ansible ユーザはコントロールノード側(Rocky-1)のみ手動で作成していますが、ターゲットノード側には存在していません。
ターゲットノードでの ansible ユーザの作成も playbook で実施したいため、 一番最初のみ root ユーザで playbook を実行させ、ansible ユーザ作成後に実行ユーザを ansible ユーザに変更する必要があります。
また、警告メッセージやフィンガープリントの確認は出ないようにしています。
[defaults]
remote_user = root
ask_pass = True
gathering = explicit
host_key_checking = False
inventory = /home/ansible/ansible/inventory
interpreter_python = /usr/bin/python3
deprecation_warnings = False
ansible 実行ユーザ作成(ターゲットノード)
ansible を実行するための共通ユーザが各サーバにすでに作成済みの場合は ssh-copy-id で鍵を配置してあげれば良いですが、今回はコントロールノードにしか存在していないため、ターゲットノード側への ansible ユーザ作成も playbook で実行します。
まず、authorized_key のモジュールを使用するので、ansible.posix の追加インストールが必要です。
$ ansible-galaxy collection download ansible.posix
$ cd collections
$ ansible-galaxy collection install -r requirements.yml
playbook は以下。
---
- hosts: RockyServers, !Rocky-1
  tasks:
  - name: Create user
    become: yes
    user:
      name: ansible
      state: present
      append: yes
      groups: wheel
      password: "{{ 'q1w2e3r4' | password_hash('sha512', 'salt') }}"
      update_password: on_create
    register: user_add

  - name: mkdir .ssh
    file:
      path: /home/ansible/.ssh
      state: directory
      owner: ansible
      group: ansible
      mode: '0700'

  - name: add authorized keys
    ansible.posix.authorized_key:
      user: ansible
      state: present
      key: "{{ lookup('file', '/home/ansible/ansible/ansible_user/ansible.pub') }}"

  - name: passwd setting
    shell:
      "chage -d 0 {{ user_add.name }}"
    when: user_add is changed
Rocky-1 = コントロールノードは作成済みのため実行対象から除外しています。
パスワードに関しては通常 Vault を使用して設定すると思いますが、今回は諸事情でホストごとにパスワードを変えるので、ユーザー作成時に有効期限を設定することで初回ログイン時のパスワード変更を強制しています。
また、公開鍵はコントロールノードの /home/ansible/ansible/ansible_user/ansible.pub に配置しています。
構文チェック後に、playbook を実行します。
$ ansible-playbook playbook.yml --syntax-check
$ ansible-playbook playbook.yml --check --ask-pass
$ ansible-playbook playbook.yml --ask-pass
ansible ユーザかつ鍵認証で接続するように変更
playbook の実行が成功し、各ホストに ansible ユーザが作成されたら ansible.cfg を修正します。
[defaults]
remote_user = ansible
ask_pass = False
gathering = explicit
host_key_checking = False
inventory = /home/ansible/ansible/inventory
private_key_file = /home/ansible/.ssh/id_rsa
interpreter_python = /usr/bin/python3
deprecation_warnings = False

[privilege_escalation]
become = true
become_method = sudo
become_user = root
become_ask_pass = true
以降の実行は ansible ユーザによる sudo で行われるようになります。
(おまけ) 複数台に鍵認証で接続するとき
ホストの台数分パスワードを聞かれるのは面倒なので、エージェントに鍵を読ませておくと楽です。
$ eval `ssh-agent`
$ ssh-add ~/.ssh/id_rsa
気に入ったらぜひ共有してください。